Angry-IPScan
Description
Angry IP Scanner (aka ipscan) is an open-source and cross-platform network scanner designed to be fast and simple to use. It is used for the discovery of live hosts.
It supports multi-threading and is highly customizable. It runs on Linux, Windows, and Mac OS X. The article is based on an installation under Kubuntu 10.04.
Installation
The 2 following methods exist to install Angry IP Scanner under Ubuntu:
- Deb file (Debian/Ubuntu package)
- Java standalone executable (no install)
Via the packages
By installing Angry IP Scanner with this method, you will be able to call the tool from Graphical User Interface (GUI) as well as from Command Line (CLI).
First download the deb file:
$ cd /data/src/
$ wget http://sourceforge.net/projects/ipscan/files/ipscan3-binary/3.0-beta4/ipscan_3.0-beta4_i386.deb
$ sudo dpkg -i ipscan_3.0-beta4_i386.deb
Then optionally create a symbolic link in your /pentest/ directory:
$ mkdir -p /pentest/scanners/ipscan/
$ ln -s /usr/bin/ipscan /pentest/scanners/ipscan/ipscan
Standalone executable
This method doesn't install Angry IP Scanner. You just download it:
$ mkdir -p /pentest/scanners/ipscan/
$ cd /pentest/scanners/ipscan/
$ wget http://sourceforge.net/projects/ipscan/files/ipscan3-binary/3.0-beta4/ipscan-linux-3.0-beta4.jar
Use following command to start Angry IP Scanner:
$ java -jar ipscan-linux-3.0-beta4.jar
Usage and examples
CLI
If you have installed Angry IP Scanner with the package, you will be able to use the Command Line (CLI).
Basic usage
$ ./ipscan [options] <feeder> <exporter>
Options
And possible [options] are (grouping allowed):
- -s
- start scanning automatically
- -q
- quit after exporting the results
- -a
- append to the file, do not overwrite
Feeder
Where <feeder> is one of:
- -f:range <Start IP> <End IP>
- -f:random <Base IP> <IP Mask> <Count>
- -f:file <File>
Exporter
<exporter> is one of:
- -o filename.txt
- Text file (txt)
- -o filename.csv
- Comma-separated file (csv)
- -o filename.xml
- XML file (xml)
- -o filename.lst
- IP:Port list (lst)
Example
$ ./ipscan -sq -f:range 192.168.100.1 192.168.100.60 -o scan.txt
Saved results to scan.txt
The GUI is automatically opened during the scan but also automatically closed (-q) at the end of the scan.
GUI
Start Angry IP Scanner
Depending on the method you used for the installation, refer to the appropriate paragraph to start the tool.
Interface
Menu
Scan
- Export all: Export all results in a file
- Export selection: Only export selected hosts from the results
- Quit: Close the application
Go to
- Next alive host: Jump to next alive host in the results
- Next open port: Jump to next open port in the results
- Next dead host: Jump to next dead (not live) host in the results
- Previous alive host: Jump to previous alive host in the results
- Previous open port: Jump to previous open port in the results
- Previous dead host: Jump to previous dead (not live) host in the results
- Find: Open a search field to look for a specific host
Commands
- Show details: Show scan detail in a popup window
- Rescan IP(s): Rescan selected host(s) and refresh the result for this (these) host(s)
- Delete IP(s): Remove selected host(s) from the results
- Copy IP: Copy selected IP address
- Copy details: Copy the content of the scan details
- Open
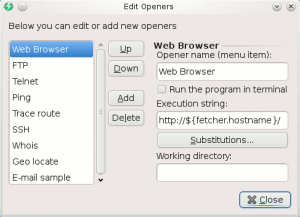
- Edit openers: Display openers for eventual modification (see screenshot)
- Web Browser: Open your default browser and point to selected host on port 80/tcp (default value) using http://host:80.
- FTP: Open your default browser and point to selected host on port 21/tcp (default value) using ftp://host:21.
- Telnet: Try to connect to selected host on port 23/tcp (default value) in a console window.
- Ping: Send ping requests/results for selected host in a console window.
- Trace route: Display traceroute results for selected host in a console window.
- SSH: Try to connect to selected host on port 22/tcp (default value) in a console window.
- Whois: Display whois information for selected host in a console window.
- Geo locate: Try to geolocate selected IP address (open default browser)
- E-mail sample: Open a mail window (default installed mail client) with selected IP(s) as title.
Favorites
- Add current: Add current scan as favorite to be able to replay the results later.
- Manage favorites: Open a window containing the list of favorites with following actions: up, down, rename, delete.

Tools
Preferences
Open the preferences window (see screenshots below)
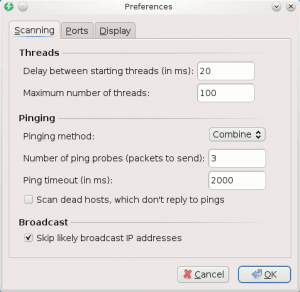
- Scanning (tab)
- Threads
- Delay between starting threads (in ms): define the delay between two scans
- Maximum number of threads: define the maximum parallel processes for the scan
- Pinging
- Pinging method: ICMP Echo, ICMP Echo (Alternative), UDP packet, TCP port proben Combined UDP+TCP. Default: ICMP Echo.
- Number of ping probes (packets to send): Number of packet sent for a ping. Default: 3
- Ping timeout (in ms): Define time to wait before considering that host is dead and sending another ping packet
- Scan dead hosts, which don't reply to pings: enable to force ports scan of not pingable hosts (some firewalls prevent from answering to ping probes). Default: false
- Broadcast
- Skip likely broadcast IP addresses: try to identify broadcast IPs and exclude them from the scan. Default: true
- Threads
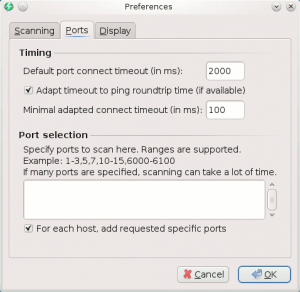
- Ports (tab)
- Timing:
- Default port connect timeout (in ms): Time before jumping to another port in case port doesn't reply. Default: 2000.
- Adapt timeout to ping roundtrip time (if available): Default: true.
- Minimal adapted connect timeout (in ms): Default: 100.
- Port selection
- Specification: Enable to filter ports to scan
- For each host, add requested specific ports
- Timing:
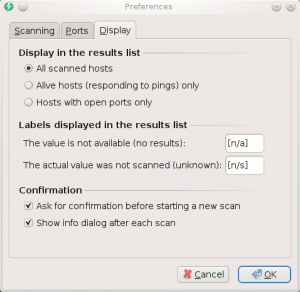
- Display (tab)
- Display in the results list: All scanned hosts | Alive hosts (responding to pings) only | Hosts with open ports only
- Labels displayed in the results list
- The value is not available (no results): Default label: [n/a]
- The actual value was not scanned (unknown): Default label: [n/s]
- Confirmation
- Ask for confirmation before starting a new scan: Show a confirmation to prevent from loosing results in case of a new scan. Default: true
- Show info dialog after each scan: Show a popup when a scan is finished. Default: true
Fetchers
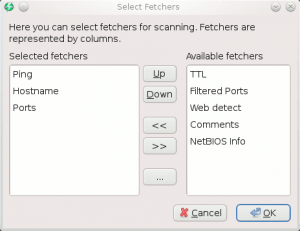
This screen enables to select the columns that appear in the results panel:
- Ping (selected by default)
- Hostname (selected by default)
- Ports (selected by default)
- TTL
- Filtered Ports
- Web detect
- Comments
- NetBIOS Info
Selection
- Alive hosts: Select all alive hosts in the results
- Dead hosts: Select all dead hosts in the results
- With open ports: Select all hosts that have at least one open port in the results
- Without open ports: Select all hosts that have no detected open port in the results
- Invert selection: Invert eventual selection
Scan statistics
Show popup with scan statistics once a scan is complete.
Help
- Getting started: Show a popup with tips
- Official Website: Open default browser and point to official website.
- FAQ Page: Open default browser and point to the Frequently Asked Questions (FAQ) page.
- Download plugins: Open default browser and point to the plugins page.
- Command-line usage: Show popup with command line usage (also accessible from CLI with ./ipscan --help)
- Check for newer version: Check for updates (needs Internet access)
- About: Show splash screen

Scan specifications
Depending on the IP range (IP Range, random, IP list file), the fields are different:
- IP Range: scan a range of IPs between a start IP and an end IP
- from: define first IP to scan
- to: define last IP to scan
- Random: scan <count> random IP(s) in the range defined by a given IP and its associated mask (e.g. 192.168.1.34 for given 192.168.1.1/255.255.255.0)
- Base IP: e.g. 192.168.1.1
- IP Mask: e.g. 255.255.255.0
- Count: Number of random IPs to generate
- IP List File
- File: browse the file to read
For IP Range and Random options, there is a field that enables the conversion of a hostname into its IP address.
Results
Show the results of a scan, with columns specified in the fetchers.


